Share

Monday, October 4, 2010

Oldie but Goodie

I always find it interesting to conjure up those old, and sometimes just plain forgotten commands and goodies that have been used with great success. Its amazing just how far Autodesk has come in improving the functionality of Civil 3D, and along with that comes tons of new and very useful commands and functions.

If you've been around awhile (like me) you may (like me) tend to forget about some of the things that have in the past made life much easier. Or perhaps we simply get complacent about them, and figure its "easier to do it this way".

One such example is the "Grip Edit" abilities of AutoCAD, ( this should not be a little known command, but may be unknown or forgotten to you) which of course is available in Civil 3D.

Oh yeah, I remember that, havent used it since 19 forgotten (oops, showing my age here). Yes it is still there, and its been around awhile, so some of you may have never even heard of it.

Well, here goes...

Draw a line on the screen, doesnt matter how long or what angle. Now select that line, you should see three square "grips", one at each end, and one dead center of the line. (If you dont see them, simply type the word grips into the command line, and set the value to 1, or 2)


Now, with the grips on, click on the center grip, it turns red (maybe, depends on some settings) but more importantly, you see the command line suddenly says "** Stretch **".


First thing we're going to do is hit the space bar, the command line will change to "** move **", hit the space bar three more times slowly, and you will see:

** Rotate **
** Scale ** and
** Mirror **

Yes, you can accomplish all these commands, just by using the grips, continue pressing the space bar until you get back to the Move command. You may now simply "drag" the line around and put it down elsewhere. Now this is really cool, but try this...

Select the line again, click on the middle grip... space bar to the move command. But this time, notice the sub-commands inside the grip edit command...

"Specify move point or [Base Point/Copy/Undo/eXit]"


press C and enter....
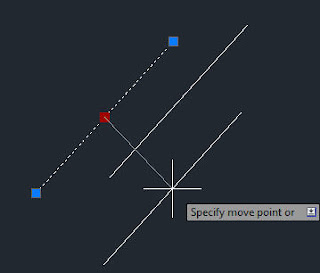

this will allow you to not only move the line, but make copies at the same time. Yes, this is just like the copy command, but sometimes, doing it this way will be much easier, especially in the older versions where you had to hit M for multiple. This command is already set to multiple.

Draw another line, select it, click on the center grip, space to the rotate command this time. Now when you press C for copy, you will be making several copies of the line rotated around the center of the line.

Draw two lines on the screen, make sure they do not touch or cross. Now select both of them, cick the grip at one end of one of the lines, and "drag" it over a grip on the second line. The lines are now connected exactly by the end points.

Dont have time to go into all the details, but practice these grip edits, i think you'll find them time saving.

Need further help, or want to know more? Email me lyoung@youngsvos.com

Friday, July 30, 2010

Ribbons – An “acquired” taste?


Do you use the Ribbon, or are you like many who have turned it off, never to be tried again, simply because it was different?

If you have turned it off, I would highly recommend turning it back on, and giving it another chance. This phenomenal tool is “Context Sensitive”, now you may or may not know what that is, but let’s just say it’s sort of like if someone were to throw a ball at you, you would react differently if it were a baseball (you would catch it), or if it were a soccer ball (you might kick it, or hit it with your head), or maybe even a billiard ball (which you would obviously try to avoid being hit by).

Ribbons react in much the same way, when you “throw” something at Civil 3D by selecting an object (must be a Civil 3d object by the way, not an AutoCAD object) then Civil 3D reacts to it differently depending upon the object selected.
Examples: if you select an alignment, then the tools associated with working on alignments are now available and displayed in the ribbon.


If you select a surface the ribbon changes and the appropriate menu items are displayed allowing you to work on the surface. This makes it much easier to find the command you need.


When you first started up Civil 3D and the ribbon magically appeared, you had no clue where the menu item was that you were looking for. This is most likely why you turned it off in the first place. Now I am suggesting, that rather than looking through all those commands, panels, and menu items to find the volumes command, or the drape image command, that simply selecting the surface (which is what you drape an image on, or what you typically use for volumes) that these menu items now display in the ribbon. This greatly reduces the amount of items you need to search through on the ribbon. This increases your speed, which increases your worth, which of course… increases your employer’s happiness.

Bottom line: Civil 3D ribbons are responsible for your boss’s happiness! (Not really of course, but it sounded good.)


Try the ribbon; I think you may find that it becomes an “acquired” taste, and it may make your boss happier in the long run as well.

Thanks for joining me on my blog.

Till next time…. Make IT Civil3D

Tuesday, April 27, 2010

Grading w/ Feature Lines Class

Youngs VOS Grading with Feature Lines on-line class now open for registration.


www.youngsvos.com/gwfl.html

Thursday, April 29th 9:00 am PDT. ONLY $24.95 (Limited to first 10 sign ups)
On-line training class.

Sign up now and learn:


•Creating Feature Lines
•Editing Elevations on Feature Line
•Create Pad using Grading Object
•Raise/Lower Pad
•Edit Pad Geometry
•Obtain Volumes of Pad
•Balance Pad Volumes

•SPECIAL 30-45 minutes of question and answer
time after the class. FREE

Thursday, March 11, 2010

New On-Line Training Program

Need to learn Civil 3D on-line, on your own time, at a very very reasonable cost? Of course you do, we all do in this economy.

Check this out.... http://tinyurl.com/yzy6x45 its free (for now) and there will be LOTS more coming.

Hope you enjoy, and please, send me an email, let me know what you think. lyoung@youngsvos.com

Join Youngs VOS as a member and get even more "free" stuff. www.youngsvos.com

Tuesday, February 9, 2010

Custom Tool Palette Video

Watch Larry Young show you how to add lines to your tool palette.

Never have to change to the layer before drawing the lines with this cool method.

http://www.youtube.com/user/lyoung1118#p/a/u/0/-t_dKs-Egl4

How about text.... create text buttons for each style right on your tool palette. What a snap !

Tuesday, January 26, 2010

You can easily judge the character of a man by how he treats those who can do nothing for him.

Friday, January 15, 2010

"Character cannot be developed in ease and quiet. Only through experience of trial and suffering can the soul be strengthened, vision cleared, ambition inspired, and success achieved."

Thursday, January 14, 2010

Part II of "Feature Lines"... in this video Larry (Youngs VOS) shows the grading from a corridor to a feature line using a particular tool from the tool palette... http://ping.fm/U3SkH
Youngs VOS presents a "Feature Line" editing video for Civil 3D. Watch Larry Young explain just how easy this is.... http://ping.fm/yxkzW

Tuesday, January 5, 2010

God is watching.... for all you know, right now, the check may be in the mail, the apology be in the making, or the job contract may be on the desk. So DONT QUIT ! If you do, you may just miss the answer to your prayer(s).