Share

Tuesday, November 27, 2012

Civil 3D - Naming Assembly Groups and Subassemblies

Ever try to create a corridor, and when you get to the "Set Targets" you have no clue which one of the thirty or so subassemblies it is you are targeting?

OF COURSE YOU HAVE !!!


Because you, (like everyone else) dont take the time to rename subassemblies in the properties box.  Its simply too easy to continue on with the good intention that "I will name them later..."  right... like that ever happens.

Well, good news!  AutoCAD Civil 3D 2013 now has the ability to prompt you for the naming of assembly groups, and subassemblies as you place them on the drawing.

YOU JUST NEED TO KNOW WHERE - right?


Look no further, here is the method for allowing the prompts to appear.

On the prospector, go to the settings tab, and expand the subassemblies collection, and the commands collection under that.  Now right click, and select "Edit Command Settings".  You will see the settings box (partially show here:)

 
Set the Assembly Group Name Prompt, and the Subassembly Name Prompt to "ON" as shown with the red arrows above.
 
Now when you insert an assembly in to the drawing and select a subassembly for insertion, you will see the following promt to name the assembly group.   There are two "groups" one on the left and one on the right, name them appropriately.


Next you will see the Subassembly Name prompt.  Typically this is shown as the name of the subassembly you are inserting.


I would advise at the very minimum to add the word "left" or "right" (as appropriate) to the name of the subassembly as shown.


You certainly do not have to do the naming in this manner, however... make sure you come up with a naming convention which will make it easier for you to determine which subassembly you are using to set the target.
 
 
Hope this helps, as always make sure you contact me or visit www.youngsvos.com any time you need help.
 
We specialize in "On Demand" training.  Training when YOU need it, on what YOU need to know.  Always on your job, so you can continue progress on your job while getting the help you need.


Visit us at: Youngs VOS Website Facebook Twitter or LinkedIn

Tuesday, November 13, 2012

5 Easy Tips For Better Civil 3D Production (By Larry Young)

    How would you like to be more productive with the tools you already have.  Well you can, simply by using these few great tips below.

    Civil 3D is a great design tool.  In fact it does a great job of "drafting" while the design is being established.   Here are a few tips to help you be more productive and you bottom line look even better.

1.  Right click is your friend!   Yes, you heard me..  in Civil 3D, at almost any time you can right click the mouse to bring up menus.  These will most often be shortcuts and are of course quicker than clicking your way through the ribbon menu system. 

2.  Which brings me to point number two, the ribbon is a great thing, and its dynamic abilities will have you at the required menu quickly.  Simply by selecting a C3D object, you can get to the menus of all things possible/useable for that particular object.  So the tip here is "Dont turn the ribbon off".

3.  Use Styles (not layers) to hide Civil 3D objects.  When freezing and thawing layers to hide a Civil 3D object, you run the risk of turning off other objects or "pieces" of objects.  This could be a problem when you suddenly realize you cant see those points (because they happen to be on the same layer your alignment was on).  The problem arises when you try to figure out which layer(s) you froze or turned off.  This could take a while.. not only that but when you turn the layer back on, you may have more on than you wish which could take you a while to figure out how to solve this problem.  The tip here is to have an invisible style for everything Civil 3D.. IE: surfaces, alignments, corridors, sections etc.

4.  Use the Object Viewer for data validation or data integrity.  You can try this by selecting a surface , "Right Click" (see tip one) and select "Object Viewer".  The tip here is to rotate the surface to a side view, this will show quickly any problem areas such as an erroneous elevation on a point causing a spike, or an entire area too high or too low due to a survey mistake.

5.  Use Civil 3D labels whenever possible rather than placing normal AutoCAD text.  This is a two fold tip, first the labels will regenerate to the proper text height in any viewport scale.  You can try this yourself by changing the scale on a viewport, regen the viewport (or regenall) and watch the text height go back to the correct size.  The second part of this is just as powerful, that is that Civil 3D labels are dynamically linked to the object they are created from.  Try this by placing a bearing and distance on a parcel line, or a point elevation on a surface.  Now when the line or surface is changed, the label will change as well.  This happens with EVERY Civil 3D label, and will NOT happen if you simply put text on the drawing indicating the bearing and distance, or the elevation.

Well there you have it, 5 tips, 5 ways to save you time and 5 ways that we "Save you money 5 minutes at a time.  Thats our slogan, thats our business here at YOUNGS VOS.  Visit us for many more tips, videos, and valuable information.

Please leave your comments or questions and i will do my best to answer them as quickly as possible.

Visit us at: Youngs VOS Website    Facebook    Twitter   or    LinkedIn Google

Tuesday, October 16, 2012

Remove Contour Label Line

You know... that pesky line that goes through the contour elevation labels.  The one that bugs you, the one that you're not even sure why it shows up, but it just irritates you.

Well.. GET RID OF IT !

Even though it does NOT plot, though it shows, and is visible. You still would feel better if it wasn't there.

Here goes.

On the tool palette, go to the settings tab.

Right click on "Surface" (1) and click on the "Edit Feature Settings (2)


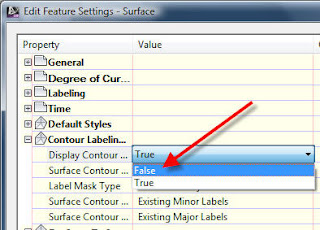
This will take you to the following window:
Expand the Contour Labeling section, in the dropdown list next to Display Contour...  Select "False"


The setting should now be "False.  (Also note the additional settings you will see in this collection)


The images below show with and without the line.

You will need to select one of the labels so that the line displays (temporarily) in order to move the line or the endpoints of the line, which results in the labels being moved.
You may need to move the labels if they are interfering with another object or text.

 Subscribe to this blog, and get notifications of every helpful tip...  till next time, remember we help "Save you money... 5 minutes at a time".

Visit us at:    Youngs VOS Website        Facebook       Twitter    or    LinkedIn


Tuesday, October 9, 2012

Viewport Type Error in Civil 3D 2013

In Civil 3D 2013 there is a new bug reported.  While trying to set a plan & profile sheet template there is a problem with the viewport type.  In order to use the plan production tools the viewports need to be defined as “plan” & “profile”. If you select the viewport and access it’s properties you will find the Viewport Type Section where you can select which type you want the viewport to be.

By default the type is “undefined”.

The issue arises when you need to change that viewport type. When you change it to anything else but the undefined, it reverts back to undefined.  It appears that the change actually takes place, select anything else, or remove the viewport from the selection set, then select again... you will notice that the Viewport Type has reverted back to undefined. This presents a real issue since you cannot use the plan production tools without the viewports set the right way.

The workaround as discovered by Matt Kolberg is to change the system variable called PROPERTYPREVIEW from on to off. (This system variable is new to Civil 3D 2013)

To do this, simply type PROPERTYPREVIEW at the command line, then enter "off" (without the quotes) and enter.

Hope this helps, till next time:  "Hang in there, it DOES get better..."

Wednesday, September 26, 2012

Hidden Benefits of Training


When you think of training, the obvious reasons for training are very common across almost all industries.  Employees learn the software in order to become more productive, more efficient, and increase profits for the company.  Yes, of course all of this is true, and very important.  But let’s take a look at a few of the hidden benefits of training, both from the employer perspective and through the eyes of the employee.

“When free food is involved, training is tolerated by all.”

                                                                                                                                                          
Retention (of employees)

            Employee turnover can be very costly, training a new employee on all of the company standards, methodologies, and “ins and outs” of the firm always has an associated cost.  New employees quite often run at a lower level of productivity and efficiency than do personnel that already know what is to be done, and what is expected from them.  This makes employee retention very beneficial.  Let’s examine the role of training with respect to employee retention.

Employees will feel like you are more interested in them and their well-being if you are willing to invest in training.  Employers interested in the well-being of the company, and its employees and wanting to keep the company on the cutting edge will likely find that the employee feels more valued.  

Employees who feel more valued will want to stay with the company if the company is willing to invest in its own future.  "We're going to send you to training"...  "We would like to see you improve and move forward with the company”.  These are statements with a significant amount of clout built into them.  They provide for the psychological boost that every employee needs and wants.  Employees greatly value educational benefits as a way of knowing the company is actually interested in them, not simply the bottom line.

Jay Lehman, the recruiting manager of Toll Brothers, Inc., a luxury homes builder says... "We invest the time and our resources and give our personnel the opportunity to excel pretty quickly."  He goes on to say, "We train them in all facets of the work, and they don't really get that from other companies," says Lehman. "We value them and they see that."

Loyaltyemployees tend to be much more loyal to companies who support their continuing education as cited:  In a study conducted by Spherion Atlantic Enterprises LLC., a staffing and employment-services firm, 61 percent of respondents who received training or mentoring said they were very likely to remain with their current employer for the next five years or more.

 
Improves morale of employee

Employees may be afraid to tell you they need help leaving them frustrated.  This may leave them feeling inadequate at best and possibly fearful of their job status.  A trained employee has more confidence in their abilities thus improving their morale and reducing stress.

Training helps the employee obtain job security as well as job satisfaction. The more satisfied the employee and the higher his confidence, the more he will contribute to organizational success, in addition employee absenteeism and turnover rates will be significantly reduced.

 
Less Supervision Required

Along with training comes an increased ability to perform a task with less supervision.  Fewer accidents and mistakes will occur resulting in substantially less time spent correcting the error.  Mistakes of this nature have a significant impact on completion of a project on time and under budget.  The hidden cost of this being the amount of time it may take for the supervisor or manager to assist in the correction process which results in lost time on other projects. 


Chances for Promotion

A well trained employee will be more eligible for advancement, and become a valuable asset for the company.  He will have the ability to move into positions that may become vacant due to attrition.  There is enormous savings potentials here in reducing the cost of training a "new employee" on all the company policies, methods and intricate corporate details.

 
Less Time lost Searching for Answers

Without training, employees needing assistance may be less likely to ask for help when faced with a challenging situation, they may therefor waste valuable time searching for answers on the Internet.  While the internet is an excellent source of free information, it may be impossible to find an answer to the exact problem at hand.  Every issue and required solution on every project is unique making solutions hard to come by.

 
"What happens if we train them, and they leave?"....

"What happens if we don't train them, and they stay?"

 
The benefits of training brought to light in this article are mostly hidden. When training is not administered, debilitating costs can often result in loss of business.  The goal of training is for the attendees to learn, master and eventually coach or train the new hires of the organization (implication here is the importance on retention of these trained employees).
 
 
For more information from Larry Young please visit www.youngsvos.com,  or visit his YouTube channel at lyoung1118.


Friday, September 14, 2012

Training? Who Needs Training, Find Anything on the Internet


So what was the world like before formal training?  There was never a time when people didn’t learn, however most of the time it was “the hard way” or out of “pure necessity”. 
 
Take the cavemen, they had to figure out how to hunt, kill and eventually cook their food… if only they had the internet back then, they could have had these answers in minutes, right?  Well maybe.  But then if they had looked up “how to hunt” they may have gotten millions of hits ranging from how to hunt a Tyrannosaurus Rex to how to hunt for berries.  Quite a difference!

So imagine now you search the internet for “how to create a grading object”… you’re likely to get the same results.  The search will result in hundreds of different features, documents, and videos on everything from creating a retaining wall, to a parking lot, to creating dozens of lot pads using a corridor model.  The fact is you may not find what it is you’re looking for, you may get close, or you may get really lucky and find exactly what it is you’re trying to accomplish.  Unfortunately the latter option is not very likely.

The reason it’s not very likely is that every project is different, every set of data is different, and every set of requirements and expected outcome is different.  The bottom line here is that correct answers are rarely a “one size fits all” solution.  You quite likely need a specialist that can assess your data, requirements, and limitations in order to teach you exactly how to accomplish the task at hand.

Next time you’re “stuck” and cannot figure out the solution, by all means search the internet for answers, but don’t spend too much time searching for the proverbial needle in a haystack.  Instead, try finding a horse (an expert) that can eat all the hay from around the needle, and get you right to the “point” (pun intended) quickly.

            Whether it's us at Youngs VOS or some other expert, I'm convinced that the experts, whoever they are, will be able to help you quickly, and save you money in the long run.

Stay tuned (in fact sign up by email to recieve all the blogs) upcoming... "The Hidden Benefits of Training" up next on LarryYoungLive blog.


Monday, September 10, 2012

Youngs VOS is now on FaceBook

We are now on Facebook... 


Visit www.facebook.com/YoungsVirtualOfficeSolutions  

and please, if you like what you see... 


Click LIKE !